Thursday, November 26, 2009

Thanksgiving Turkey Cupcakes

It's Thanksgiving! That means lots of food, family, and football :) My grandmother asked me to make some cupcakes for our late lunch tomorrow, and I thought that cupcakes decorated like turkeys would be perfect!


Cake Ingredients:
1 French vanilla box cake mix
1 (3.4 oz) package of Pumpkin Spice Jello pudding
1 1/4 cup water
1/3 cup vegetable oil
3 eggs

Directions:
Preheat your oven to 35o degrees. Line a muffin tin with 24 cupcake papers. Blend all ingredients with a mixer for about 2 minutes on medium-high speed. Fill cupcake papers 2/3 full and bake for 15-18 minutes. Let cool for 5 minutes, then allow to fully cool on a cooling rack.

Chocolate Buttercream Icing: (I doubled the recipe for 24 cupcakes, but that was really too much. Maybe one and a half batches next time)
1 cup vegetable shortening
1 teaspoon vanilla
3/4 cup unsweetened cocoa, or 3 (1 oz) squares of melted unsweetened chocolate
4 cups confectioners' sugar
3-5 Tablespoons milk or heavy whipping cream

Directions:
Cream the shortening for about 2 minutes. Add chocolate or cocoa and blend thoroughly. Add vanilla. Gradually add the confectioners' sugar, pausing occasionally to scrape the sides and bottom of the bowl with a rubber spatula. Add milk or heavy whipping cream and continue beating for about 30 seconds. If you want a more spreadable consistency, add more milk, one tablespoon at a time.

After the cupcakes have cooled and the icing had been made, you are ready to decorate. You will need a pastry bag, candy corn, and pearl white dragees. Using the pastry bag, swirl a layer of frosting on top of each cupcake. On the outer edge of each cupcake, make a small mound of frosting.


Stick 5 candy corn, white end down, on the opposite edge of the cupcake, and place one on the front of the mounds of frosting for the turkey's beak. Place two of the white dragees above the candy corn beak, and voila! Turkey time!


I hope the kids will love these. I know my daddy will ;) Happy Thanksgiving, everyone! God Bless!

Wednesday, November 25, 2009

THE Banana Nut Bread

Daddy has been begging for me to make some homemade banana nut bread ever since we bought bananas earlier this week. He intentionally let the bananas sit and slowly turn spotty in an effort to encourage me. So, finally, today I gave in and made some. This is a really good recipe that I got from Food Network about a year ago, and it's our favorite one to use. I've tweaked it a few times to include chocolate chips, and that turns out wonderful, as well. Also, these can very easily be made into muffins. Just reduced the time that you cook them to about 20-25 minutes.

Ingredients:
4 ripe bananas
1 cup sugar
3/4 cup melted butter, cooled to room temperature
1 teaspoon vanilla flavoring
2 eggs
2 cups self-rising flour
1 cup chopped pecans

Directions:

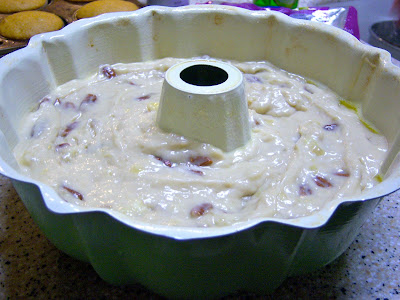
1. Preheat your oven at 350 degrees, and spray a tube pan with cooking oil. In your electric mixer or with a handheld mixer, whip together two of the bananas and the sugar for about 3 or 4 minutes. You'll want a light and fluffy mixture. Mash together the remaining two bananas in a small bowl, making sure to leave a few little chunks for some texture.


2. Add the melted butter, eggs, and vanilla flavoring in with the whipped banana mixture. Mix until all of the ingredients are incorporated. Add all of the flour and mix until just incorporated. Otherwise you won't like this recipe very much :)

3. Using a spatula, mix in the pecans and mashed bananas. Pour into the greased pan and cook for 45 minutes.


My family LOVES this recipe, and we have used it numerous times. I even gave a speech last semester on how to make this bread. My advice: try it. You will love it :)

What I've Been Up To...

So, it has been a little while since my last post. It's been such an eventful week! I seem to be drowning in my pile of papers and tests for school lately. But I'll fill you in on what I've done in the past week and a half.

First, the Air Force cake for a going away party that I mentioned in my last post. I delivered it last Friday, and they really liked it! However, I had pneumonia last week, so I was kind of exhausted when I was making it.


I did ask my mom to bring home some surgical masks from work, though, so that I wouldn't get my ooze all over the cake when I was decorating it. Practice safe cake decorating, y'all!


Then, I had an idea for Santa Hat cupcakes, and I just had to test them out. I think they're simple and cute :)


Well, that was last week! I'm getting ready to post a couple more posts with recipes, so stay tuned!

Monday, November 16, 2009

Raspberry Cheesecake Cupcakes

Daniel's friend, Kelsey, celebrated her 19th birthday last Friday, and it's kind of a fact that I will now bake cupcakes for his friends on their birthdays. For her birthday, she wanted something with raspberries and white chocolate, so I decided that raspberry cheesecake cupcakes would be perfect.

Ingredients:
1 1/2 cups crushed chocolate graham cracker crumbs
5 Tbsp butter, melted
2 (8 oz.) packages of cream cheese
3/4 cup sugar
4 eggs
2 Tbsp self-rising flour
1 Tbsp vanilla extract
frozen raspberries, thawed
1 oz. block of white chocolate

1. Preheat your oven at 350 degrees. Line a cupcake tin with about 16 cupcake papers. Mix together the graham cracker crumbs and the melted butter. Fill the bottom of each cupcake paper with 1 Tbsp of the mixture, then pack down tightly with clean hands.


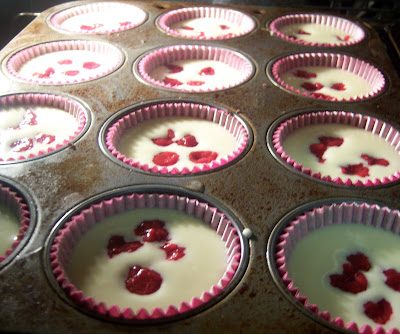
2. In a large bowl, beat together the cream cheese and the sugar until well blended. Add the eggs one at a time until incorporated, then add the flour. Lastly, blend in the vanilla extract. Fill the cupcake papers with the cheesecake batter, then place about 4 or 5 thawed raspberries into the batter.


3. Bake for about 20 minutes, or until the tops are slightly golden. Refrigerate for 2 hours, then shave off curls of the white chocolate on top of each cupcake.


YUM!

Dive Flag Cake and Cookies

It's been a few days since my last post. School is pretty stressful this week, so I probably won't have time to cook much this week, either. But I do want to share what I was up to last week.

I had a cake order from a girl on Facebook whose boyfriend likes to go scuba diving, and so she asked me to bake him a small cake representing the dive flag, along with matching peanut butter cookies. In between the two layers of chocolate cake, I put a chocolate ganache frosting and chopped pieces of Snickers candy bars. I really wish I would have baked a small version of this cake for myself :(


And this is what the finished product looked like. I ran out of room to put his name on the cake, so I sculpted a scuba man out of fondant and stuck him in some "water" surrounding the edges of the flag.


A close-up of Scuba Craig, my first ever sculpted person for a cake.

The matching peanut butter cookies decorated with Royal icing.

So, that was this week's cake/cookie order! Stay tuned for this week's order, an Air Force symbol cake.

Sunday, November 8, 2009

Pizza Roll

I saw these over at Taste Buds, and I decided that I absolutely had to try them out for tonight's dinner!

First, preheat your oven at 425 degrees. Then, roll out a tube of refrigerated pizza dough on a floured surface.


Brush with a little bit of olive oil and add cheese and toppings, but no sauce. I chose to do two pizza rolls, one with bacon and slices of mushroom, and one with turkey pepperoni. Make sure to leave about an inch of dough on all four sides.


Start rolling the dough towards you with one of the shortest sides. Place on a baking sheet with the seam side down, and tuck the dough on the sides underneath the roll. Brush more olive oil on top, sprinkle with salt and dried oregano.


Bake for 20 minutes, then remove from your oven and sprinkle the tops of each roll with grated Parmesan cheese. Let cool for 5-10 minutes before slicing.

Bacon and mushroom with mozzarella cheese.
Turkey pepperoni and mozzarella cheese.

These are definitely a new favorite with my family. They are so easy to make, and very, VERY yummy! I totally suggest that you try them, as well!

Friday, November 6, 2009

Mountain Dew Cupcakes, Take 2

I delivered yesterday's cupcakes to the daycare this morning, and Bella Kate and her mom, Mrs. Corey, loved them! The daycare teachers liked them, as well, and I've already gotten some new potential customers who are friends of Mrs. Corey! How exciting!

Since the last Mountain Dew Cupcakes didn't turn out as I'd hoped, I decided to give them another go using a different recipe. This one involves a boxed cake mix using Mountain Dew instead of water, a soak of reduced Mountain Dew, and a fluffy Mountain Dew frosting.


Cake Ingredients:
1 white box cake mix
3 egg whites
1 1/4 cups Mountain Dew soda
1/3 cup vegetable oil
3.4 oz. package of pudding (I used cheesecake pudding for this recipe because it's really all I had... it was either that or pumpkin spice!)

Icing Ingredients:
1 cup vegetable shortening
1/2 cup (1 stick) unsalted butter, soft
1.5 pounds confectioner's sugar (I had a 2 pound bag and used over half of it, roughly 1.5 pounds)
Mountain Dew (use what you have left from dipping the cupcakes)
Lime green food coloring

Cake Directions:

1. Preheat your oven at 350 degrees, and place 24 cupcake liners in a tin.

2. Add all ingredients to a standing-mixer fitted with a large bowl, or to a large bowl to use with a hand mixer, depending on what you have. Mix on low speed for 30 seconds, then medium-high speed for about 2 minutes until all ingredients are incorporated and no lumps remain. (This is what the box mix I used instructed to do. If the box you use calls for something else, follow those instructions.)

3. Fill the liners 2/3 full and bake for about 18 minutes or until a toothpick inserted into the center of one of larger cupcakes come out clean.

*WHILE THE CUPCAKES ARE IN THE OVEN, prepare the Mountain Dew that you will use to soak the hot cupcakes. Pour one can of Mountain Dew into a small pan and bring to a boil over medium heat. Boil for about 5 minutes, then reduce heat to low and simmer for 5 more. Remove from heat and set aside. I ran out of Mountain Dew and had to use some of Daddy's off-brand Mountain Lightning, which is similar, but with a slightly sweeter taste.*


4. Allow the cupcakes to sit for a few minutes so that they are not too hot to touch, then move them to a cooling rack. Dip the tops of each cupcake into the Mountain Dew. I dipped them twice, but just use your judgement on how many times you want to soak them. Let them cool completely before icing them.


Icing Directions:
Beat together the butter and shortening at medium speed until fluffy. Reduce the speed to low, and gradually add confectioner's sugar until incorporated. Add the remainder of the Mountain Dew soak, or just the amount that gives you the texture that you want. Mix in as much food coloring as you want until you get your desired color. Add frosting to the tops of the cooled cupcakes, and add some sprinkles, if you want :) I added orange sprinkles to the green frosting to coordinate with the Mountain Dew bottle.


These turned out much better than the other ones! You definitely get more of a Mountain Dew flavor with them, mainly due to dipping the tops of the cakes into the reduced soda. I think that Daniel will approve of them! I'm also going to take what's left to the Alabama vs. LSU tailgate tomorrow, thus the football cupcake papers. ROLL TIDE :)

EDIT: This is what happens when you leave cupcakes on the table... if you have a kitty. Needless to say, Bellatrix was bouncing off the walls all night long.

Thursday, November 5, 2009

Rainbow Cupcakes and Pink and Brown Cupcakes

One of my favorite types of cupcakes are rainbow/psychedelic/tie-dye cupcakes. They are so much fun to make, and everyone always loves them. How can anyone NOT love them? Seriously. I've made them a few times, and I had an order this week for a little girl's birthday at the daycare I worked at last semester, so of course I said yes!

Ingredients:
white cake batter (I always use Betty Crocker's White Cake mix. Just prepare the mix according to the back of the box, but make sure it's a plain white cake mix)
5 or 6 different food colors (You can really choose any amount of colors. I used pink, orange, yellow, lime green, blue, and purple)


Directions:

1. Preheat your oven at 350 degrees. Prepare about 20 cupcake papers in a muffin tin.

2.Divide the cake batter evenly into separate bowls. Since I had 6 different food colors, I divided the batter equally between 6 bowls.


3. Stir in the different food coloring into each bowl, making sure no white batter is left.


4. Using a spoon, drop small amounts of each color of the prepared batter, one at a time, into each cupcake paper. Don't try to smooth the batter out with the spoon. It will look much more psychedelic if you let the colors fall where they want inside of the tin. Bake for 15-18 minutes. You want them to be just done enough to where a toothpick comes out clean, but not so done that the bottom layer of color is becoming brown.


5. Let them cool for about 20 minutes, then top each one with light, fluffy, white frosting. Clouds on top of rainbows :)


They also ordered a second batch of cupcakes for her family birthday party on Saturday, and these were simply chocolate cupcakes (Great-Grandma's famous recipe) topped with cream cheese icing (which was divine), but her mom told me to surprise them with a design. So, I went with a pink and brown theme!


Topped with a pink fondant flower with the initial B, and sprinkled with luster dust.

Pink cream cheese frosting and white pearl sprinkles.

I think I might attempt the Mountain Dew cupcakes again tomorrow if I don't decide to take a nap. It's currently 2:08 and I have to deliver the cupcakes at 8:30. However, I have no cake boxes, so I have to get up extra early to search the Pell City Wal-Mart for white cake boxes because the one in Moody had none. Cross your fingers that they have some! xx

Stove-Top Mac and Cheese

Anyone that knows me, knows that I love cheese. If a recipe calls for 1 cup of cheese, chances are I'm going to make it 2 cups, instead. I'm always looking for new mac n' cheese recipes, and I found one over at YumSugar that I decided to test out. I didn't have a few of the ingredients like hot sauce and dijon mustard, so I excluded those. This is the recipe that I followed:

Ingredients:
2 1/2 cups dry elbow macaroni noodles (the recipe calls for 3 cups of small and large shell pasta, but I was short on pasta, so I used elbow macaroni, instead)
2 tablespoons unsalted butter
2 tablespoons flour
1 cup skim milk
1 3/4 cups grated sharp cheddar cheese
4 ounces Velveeta, diced
salt
freshly ground black pepper
1/4 cup crushed Ritz crackers
2 tablespoons Parmesan cheese

Directions:

1. In a large pot of salted, boiling water, cook the dry pasta until soft, about 8 minutes. Drain the pasta.

2. Return the pot to medium heat and melt the butter. Add the flour and whisk continuously for about 2 minutes.

3. Gradually whisk in the milk and continue cooking for about 5 minutes until the sauce has thickened.


4. Add the cheeses and continue stirring until all has melted. Add salt and pepper to taste.


5. Pour the mac n' cheese into a greased pan (I used a 9x9, I believe). Mix together the cracker crumbs and the Parmesan cheese and sprinkle over the top of the pasta. Put in your oven, set to broil, for 4 minutes or until the top has become golden brown. Be careful not to let it burn! I can't tell you how many times I have burned the crust layer of pasta in my oven.


My mom and dad both really liked this recipe, and it is definitely one I will use again. I might even test it out on Daniel and see what he thinks. Next time, however, I will add more milk, maybe about 1/2 cup. I think that since I used skim milk, the sauce got far too thick and was not as creamy as the original recipe. All in all, I'd give this attempt a 4/5.

Wednesday, November 4, 2009

Mountain Dew Cupcakes

Daniel made a request for Mountain Dew cupcakes, and of course I'm always game for trying a new recipe, and I like unusual recipes. He drinks Mountain Dew all of the time, so why not eat it in a cupcake? I found a recipe on How To Eat A Cupcake that I decided to tweak a little bit.

Cake Ingredients:
1/2 cup (1 stick) unsalted butter, room temperature
1 cup sugar
2 large eggs
1/4 cup plus 2 tablespoons Mountain Dew soda
1 1/4 cups plus 2 tablespoons self-rising flour
1 (3.4 oz) package of lemon pudding (after I baked the cupcakes, I read somewhere that Mountain Dew is actually an orange-based flavor, but I never knew that! so, if you want to use a simple vanilla, that would probably be okay)

Cake Directions:
1. Preheat your oven at 325 degrees. Place 12 cupcake liners into a muffin tin to be ready when you're done with the batter.

2. Cream together the softened butter and 1 cup of sugar in a standing mixer or in a large bowl with a hand-held mixer. You'll want this to be light and fluffy, so around 3-5 minutes is a good time frame. Add the eggs one at a time, mixing until incorporated after each addition, scraping the sides of the bowl with a spatula when necessary.

3. In a separate, small bowl, mix all of the flour with the package of dry pudding mix. Alternately add in the dry ingredients and the Mountain Dew, starting with the dry and ending with the dry. I divided the dry ingredients into thirds (flour - Mountain Dew - flour - Mountain Dew - flour). The batter will be fairly thick.

After all of that, I took a second to lick the beaters, of course! The batter tastes like the lemon bars that I make, and it was wonderful.

4. Fill the prepared liners about 2/3 full, which for me is about a spoonful of the batter.


5. Bake for about 20-23 minutes, then let cool before topping with frosting.

It took my oven 23 minutes before a toothpick inserted into the center of the largest cupcake came out clean, so next time I will probably up the temperature to 350 degrees and reduce the time to around 18 minutes. You know your oven, though, so just keep an eye on them after around 15 minutes just to be safe. They'll be golden brown and beautiful like this once they are done:

The cupcakes are dense, almost like a pound cake, but they actually were quite yummy. They don't really taste like Mountain Dew, but they are still good. I will be doing some further tweaking next time, though, to try to get the taste closer to that of the Dew.

I was not a fan of the frosting I created to go with these, so I am not going to even bother posting the recipe for it. It was far, far too sweet, even for the sweetest of sweet-tooths. I didn't try the recipe from How To Eat A Cupcake, but I probably will the next time I make these. I advise that if you are going to make these, try that recipe!

I have two cupcake orders that I will begin working on tomorrow, so there will probably be a couple of new posts up by Friday morning at the latest! Make sure to check them out, because they are going to be SUPER cute :)