Whoa, it's been a while! I recently watched It's Complicated, and ever since then, I have been so inspired by Meryl Streep's character. Her bakery is amazing and the epitome of what I want mine to be, and she made some amazing-looking chocolate croissants. I have been itching to try to make some of my own, and I finally did last night! To start, I used the a basic croissant recipe, which I found on Tracey's Culinary Adventures, and just added some chocolate chunks.
Ingredients:
3 and 1/2 cups of flour (I always use self-rising)
1 cup of "barely warm" water
1 teaspoon active dry yeast
1/3 cup of heavy cream
1 teaspoon of salt
3 and 1/2 sticks cold unsalted butter
Nestle chocolate chunks, or your favorite solid chocolate bar, chopped, or chocolate chips
Instructions:
1) In a medium-sized mixing bowl, whisk 1 cup of the flour with yeast and warm water until all of the lumps of flour have been incorporated and the mixture is smooth. Set the bowl aside, uncovered, for about an hour. The mixture will look about the same, but the surface should be covered in bubbles from the yeast.

2) Add the remaining 2 and 1/2 cups of flour to the yeast mixture, followed by the heavy cream and salt. Knead this mixture for one minute. (I used a standing mixer fitted with a dough hook.) Leave the dough in the bowl, cover with plastic wrap, and set aside at room temperature for 20 minutes.

3) Continue kneading the dough. If you are kneading by hand, do so for 10 minutes on a lightly floured surface. If you are using a standing mixer with a dough hook, like I did, knead for 20 minutes on the lowest speed. The dough should be smooth and elastic by the end of the process. Cover the dough with plastic wrap and place it in the fridge for about 30 minutes.
4) Place the cold butter sticks in-between two sheets of plastic wrap and, using a rolling pin, pound the butter into an 8-inch square.
5) Remove the dough from the refrigerator and roll it out on a floured surface into a 9 x 17 inch rectangle. Place the square of butter on bottom half of the rectangle, using your hands to shape the butter if necessary, making sure to leave a little extra dough on the sides for pinching to ensure the butter does not seep out.

6) Fold the top half of the rectangle of dough over the bottom half and the butter, pinching the dough on the sides to encase the butter.

7) Roll the folded dough back out into a 9 x 18 inch rectangle. After you have done this, you will fold the dough into thirds, as if you were folding a letter to place into an envelope. Start with the 9-inch side that is closest to you, folding up.

Then, fold the top portion of the rectangle evenly over the lower portion. After you have completed this, you have completed one full "turn", which is what will give the croissants their flakey, buttery layers once they have been baked.

8) Turn the dough so that the single, folded side is on your left, like the spine of a book. Repeat the turn process from step 7. Make two fingerprints in the corner of the dough, indicating that you have completed two turns... you know, just in case you forget ;) Wrap the dough in plastic wrap again and refrigerate for at least an hour.

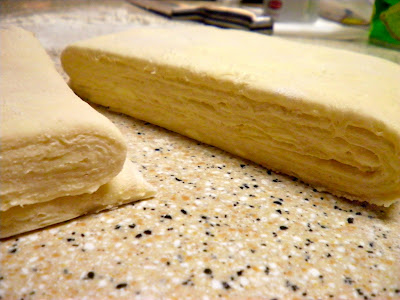
9) After the dough has been in the fridge for an hour, remove it and complete two more full "turns." Now, you have two options. You can either immediately begin rolling out the dough to be cut into triangles, or you can wrap and refrigerate it again for up to 24 hours. It is encouraged that the dough be wrapped and refrigerated because it "improves the flavor", but I just couldn't wait that long. Line two baking sheets with parchment paper before you continue. Cut the dough in half. You should be able to see all of the yummy layers after doing this.
10) On a lightly floured surface, roll each half of the dough into a 6 and 1/2 by 20 inch rectangle. Transfer the dough to the lined baking sheets that you prepared earlier, and refrigerate for 20 minutes.
11) Remove one of the rectangles from the fridge and return to your work surface. You're ready to cut out the triangles! On one of the long ends, using a measuring tape or ruler, measure 5 inches from the left and make a notch in the dough with a knife. Do this every 5 inches. On the other long side of the dough, start 2 and 1/2 inches from the left, make a notch, and continue making notches every 5 inches. These will be the points of the triangles when you have cut them, which you are now ready to do. Using a long knife, you will basically "connect the dots", cutting out the triangles as you go.

12) Now you're ready to roll. Cut a slit in the bottom of each of the triangles, exactly in the middle. This helps create the curve of the croissant. Place your chocolate neatly along the bottom of the dough in a position where it will remain in the dough as you roll it.

Roll the dough up as tightly as you can, forming the curve as you go. When you have finished, the tip of the triangle should be underneath. Continue until all of the dough has been rolled, cut, and finished.

13) Place the rolled dough back onto the baking pans you prepared earlier. Cover with plastic wrap. Now you have a few options for proofing, as well: overnight in the fridge, 3 hours in a cool place, or 1 hour in a warm place. I let mine sit for a while at room temperature, because I am impatient. Waiting overnight is supposed to give them more flavor, so I might try that next time, even though the flavor was still awesome.
14) In a small bowl, whisk together one egg and a splash of heavy cream as an egg wash to brush over the tops of each of the croissants. Preheat the oven to 375 degrees, and bake for about 30 minutes, or until golden brown and flakey. Allow them to cool on a wire wrack before serving.

This is definitely a long process that takes a lot of work, but I believe it is worth it, especially if you love croissants as much as I do :)
