Sunday, December 19, 2010

Homemade Hot Chocolate

Well, I'm home for the holidays and finally getting the chance to cook! I've missed it a lot. I made homemade lasagna with turkey meat (I'm allergic to beef) and cheese bread for dinner, and afterwards I decided I wanted some hot chocolate.

Ingredients:
1/3 cup unsweetened Hershey's cocoa powder
1/2 cup white sugar
4 and 1/2 cups of skim milk
1 teaspoon vanilla
whipped cream for topping (optional)
extra cocoa powder for garnish (optional)

Instructions:
1) Mix together the cocoa powder, sugar, and 1/2 cup of the milk in a saucepan over medium heat. Bring to a boil, stirring constantly.

2) Add the remaining milk and allow to increase in heat, but not to boil.

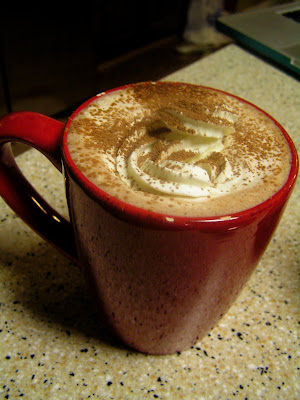
Once it is hot, add to mugs and garnish with whipped cream and cocoa powder, or cinnamon, or a peppermint... whatever you like. I added homemade whipped cream and dusted it with cocoa powder :)

Tuesday, August 10, 2010

Chocolate Croissants

Whoa, it's been a while! I recently watched It's Complicated, and ever since then, I have been so inspired by Meryl Streep's character. Her bakery is amazing and the epitome of what I want mine to be, and she made some amazing-looking chocolate croissants. I have been itching to try to make some of my own, and I finally did last night! To start, I used the a basic croissant recipe, which I found on Tracey's Culinary Adventures, and just added some chocolate chunks.

Ingredients:
3 and 1/2 cups of flour (I always use self-rising)
1 cup of "barely warm" water
1 teaspoon active dry yeast
1/3 cup of heavy cream
1 teaspoon of salt
3 and 1/2 sticks cold unsalted butter
Nestle chocolate chunks, or your favorite solid chocolate bar, chopped, or chocolate chips

Instructions:

1) In a medium-sized mixing bowl, whisk 1 cup of the flour with yeast and warm water until all of the lumps of flour have been incorporated and the mixture is smooth. Set the bowl aside, uncovered, for about an hour. The mixture will look about the same, but the surface should be covered in bubbles from the yeast.


2) Add the remaining 2 and 1/2 cups of flour to the yeast mixture, followed by the heavy cream and salt. Knead this mixture for one minute. (I used a standing mixer fitted with a dough hook.) Leave the dough in the bowl, cover with plastic wrap, and set aside at room temperature for 20 minutes.


3) Continue kneading the dough. If you are kneading by hand, do so for 10 minutes on a lightly floured surface. If you are using a standing mixer with a dough hook, like I did, knead for 20 minutes on the lowest speed. The dough should be smooth and elastic by the end of the process. Cover the dough with plastic wrap and place it in the fridge for about 30 minutes.

4) Place the cold butter sticks in-between two sheets of plastic wrap and, using a rolling pin, pound the butter into an 8-inch square.

5) Remove the dough from the refrigerator and roll it out on a floured surface into a 9 x 17 inch rectangle. Place the square of butter on bottom half of the rectangle, using your hands to shape the butter if necessary, making sure to leave a little extra dough on the sides for pinching to ensure the butter does not seep out.


6) Fold the top half of the rectangle of dough over the bottom half and the butter, pinching the dough on the sides to encase the butter.


7) Roll the folded dough back out into a 9 x 18 inch rectangle. After you have done this, you will fold the dough into thirds, as if you were folding a letter to place into an envelope. Start with the 9-inch side that is closest to you, folding up.


Then, fold the top portion of the rectangle evenly over the lower portion. After you have completed this, you have completed one full "turn", which is what will give the croissants their flakey, buttery layers once they have been baked.


8) Turn the dough so that the single, folded side is on your left, like the spine of a book. Repeat the turn process from step 7. Make two fingerprints in the corner of the dough, indicating that you have completed two turns... you know, just in case you forget ;) Wrap the dough in plastic wrap again and refrigerate for at least an hour.


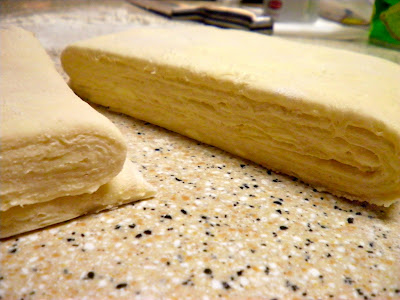
9) After the dough has been in the fridge for an hour, remove it and complete two more full "turns." Now, you have two options. You can either immediately begin rolling out the dough to be cut into triangles, or you can wrap and refrigerate it again for up to 24 hours. It is encouraged that the dough be wrapped and refrigerated because it "improves the flavor", but I just couldn't wait that long. Line two baking sheets with parchment paper before you continue. Cut the dough in half. You should be able to see all of the yummy layers after doing this.


10) On a lightly floured surface, roll each half of the dough into a 6 and 1/2 by 20 inch rectangle. Transfer the dough to the lined baking sheets that you prepared earlier, and refrigerate for 20 minutes.

11) Remove one of the rectangles from the fridge and return to your work surface. You're ready to cut out the triangles! On one of the long ends, using a measuring tape or ruler, measure 5 inches from the left and make a notch in the dough with a knife. Do this every 5 inches. On the other long side of the dough, start 2 and 1/2 inches from the left, make a notch, and continue making notches every 5 inches. These will be the points of the triangles when you have cut them, which you are now ready to do. Using a long knife, you will basically "connect the dots", cutting out the triangles as you go.


12) Now you're ready to roll. Cut a slit in the bottom of each of the triangles, exactly in the middle. This helps create the curve of the croissant. Place your chocolate neatly along the bottom of the dough in a position where it will remain in the dough as you roll it.


Roll the dough up as tightly as you can, forming the curve as you go. When you have finished, the tip of the triangle should be underneath. Continue until all of the dough has been rolled, cut, and finished.


13) Place the rolled dough back onto the baking pans you prepared earlier. Cover with plastic wrap. Now you have a few options for proofing, as well: overnight in the fridge, 3 hours in a cool place, or 1 hour in a warm place. I let mine sit for a while at room temperature, because I am impatient. Waiting overnight is supposed to give them more flavor, so I might try that next time, even though the flavor was still awesome.

14) In a small bowl, whisk together one egg and a splash of heavy cream as an egg wash to brush over the tops of each of the croissants. Preheat the oven to 375 degrees, and bake for about 30 minutes, or until golden brown and flakey. Allow them to cool on a wire wrack before serving.


This is definitely a long process that takes a lot of work, but I believe it is worth it, especially if you love croissants as much as I do :)


Wednesday, May 26, 2010

2010 Graduation

Last week, my baby cousin Zak graduated from PCHS in the middle of the pouring rain. Zak hates attention, so when it came to a graduation party, he actually had to agree to allow a party to take place at his house, under the condition that it would not be labeled a graduation party. He called it a "Barbeque and Bring Zak Money" party, and his mom opened all of the cards for him. Aunt Skeeter asked me to make the cake for the get-together, but Zak didn't want his name to be on the cake since it wasn't "his party." I made my standard white cake with buttercream, and even made some matching cupcakes. The colors are the school colors for the University of West Alabama, which is where he will be moving in the fall. He received a nursing scholarship to UWA, which is so awesome! We are all so proud of him, even if he didn't want his own party, and we know he will do so great at West Alabama.


Congrats, Zak! You deserve it!

Sunday, May 16, 2010

Fried Oreos

Sounds fattening, right? Well, they are, but they are sooo worth it! These were the last treats that I made for our camp-out, and I had to make a bunch of extras to leave at home for my dad and brother.

Instructions:

1. Heat vegetable oil in a deep fryer to 400 degrees. Mix together 2 and 1/2 cups of pancake and waffle mix with about 1 cup of water. If you want the batter to be slightly thinner, add a little bit more water.
2. Once the oil has reached the right temperature, dip each Oreo (you will use about 24 cookies) into the pancake batter, then drop them into the hot oil. I worked with about 3 in the fryer at one time.
3. When the batter is golden brown, use a slotted spoon or tongs to remove the fried Oreo from the oil and place them onto a paper plate covered with 2-3 paper towels. Allow to cool for about 10 minutes, then dust with Confectioners' sugar.
Enjoy!

Chocolate Spicy Aztec Cookies

This is another cookie modified from a cupcake recipe. My friend, Korri, wanted the Aztec cupcakes for our camp-out, but I decided to make a cookie version, instead. These cookies are very different, and some people are scared to try them if I tell them that they have chili powder in them. The spice doesn't really hit you until a few seconds after you have bitten into it, and the combination of chocolate and cinnamon is actually very tasty. You can also adjust the amount of chili powder you add to the cookie if you want a more/less spicy flavor.

Ingredients:
1/2 cup (1 stick) unsalted butter, softened
1/2 cup light brown sugar
1/4 cup white sugar
1 large egg
1 teaspoon vanilla extract
1 cup self-rising flour
1/4 cup cocoa powder
1/2 teaspoon ground cinnamon
1/4-1/2 teaspoon chili powder
3 (1 ounce) squares white chocolate, chopped

Instructions:

1. Preheat your oven to 350 degrees. Line two baking sheets with parchment paper.

2. In an electric mixing bowl, beat the butter, light brown sugar, and white sugar until light and fluffy. Add the egg and vanilla extract until blended well. Sift together the flour, cocoa powder, cinnamon, and chili powder. Reduce the mixing speed to low and slowly add the flour mixture just until incorporated. Turn off the mixer and add white chocolate chunks to the dough, stirring with a rubber spatula.

3. Using a tablespoon or ice cream scoop, drop the dough onto the cookie sheets, spacing them two or more inches apart.

4. Bake for 10-12 minutes, remove from oven, and allow to cool about 5 minutes before transferring them to a cooling rack to cool completely.

Margarita Cookies

This weekend, my friends and I decided to camp out at Daniel's house to celebrate everyone being back in town from college. I told them to make some food requests and I would bring some goodies to snack on. Nikki requested margarita cupcakes, but I figured that the cupcakes wouldn't do very well out in the open, so I decided to look for a margarita cookie recipe. I found this one over at Smitten Kitchen and decided to give it a try.

Ingredients
2 sticks (1 cup) unsalted butter, softened
2/3 cup Confectioners' sugar
2 large egg yolks
pinch of salt
2 teaspoons tequila (I used one teaspoon Jose Cuervo Premium tequila, and one teaspoon Jose Cuervo Premium margarita flavored tequila)
Grated zest of 2 limes
2 cups self-rising flour

Coating:
1/2 cup clear sanding sugar
2 teaspoons flaky salt (I used regular table salt)

Instructions:

1. Beat the softened butter in an electric mixing bowl with the paddle attachment until creamy. Add the Confectioners' sugar and beat until the mixture is smooth. Beat in one of the egg yolks, followed by salt, tequila, and lime zest. Reduce the mixing speed and add the flour just until incorporated. Do NOT over-beat. I only used the mixer for about 20 seconds after I added the flour, and then I used a rubber spatula to mix it the rest of the way.

2. Turn the dough onto a floured surface, gather into a ball, and divide it into two. Wrap each half in plastic wrap and place in the refrigerator for about 30 minutes.

3. After 30 minutes or more, remove the dough from the fridge and roll into logs that are about 1 inch - 1 and 1/4 inches thick. I ended up having to divide each of the halves again, then rolled the fourths into smaller logs. Re-wrap each log with plastic wrap and place back into the refrigerator for about 2 hours.

4. Preheat your oven to 350 degrees. While the oven is preheating, prepare the sugar/salt coating. In a bowl, whisk the remaining egg yolk until it is thin enough to be a glaze. Spread the salt and sugar onto wax paper or a cutting board. Remove the dough from the fridge, brush with the egg yolk, and roll through the sugar and salt.

5. Slice the logs into 1/4 inch thick cookies, and place on a lined cookie sheet, spacing each cookie about 1/2 inch apart. *Don't forget to line the pan with parchment paper. I forgot, and you'll see how that turned out..*

6. Bake for about 12 to 14 minutes. Remove from oven and allow to cool completely on a cooling rack before removing them from the pan.

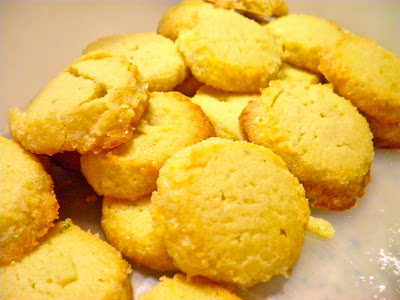
As you can see, I forgot to add parchment paper to the pan. I was only able to save about 30% of the cookies :( They were pretty yummy, though! I might tweak them a little bit next time, though, because they were a teensy bit dry. But all-in-all, the flavor was very good.