Thursday, December 19, 2013

Surprise Birthday Cupcakes

Today was my sister-in-law Lauren's birthday, and my brother wanted to surprise her and her third graders after lunch with a mini birthday party. He pretty much told me I had free range on decorating the cupcakes, and since I haven't really done anything creative in the kitchen lately, I decided to make some little mini flags to go on top of them. Not incredibly creative, but I had fun making them!


I just used some toothpicks, a hot glue gun, scrapbook paper, and scissors to make the little flags that I used as toppers for each cupcake. I had some leftover scrapbook paper from when I made bookmarks for the class I taught in last semester, and so I used some of that in two different patterns that used the same color palette.


For the cupcakes, I just made plain vanilla, and topped it with some pink cream cheese frosting! And a ton of gold sprinkles. Honestly, you can never have enough sprinkles.


I overheard one of the little girls in Lauren's class say, "I wish I could have a cupcake that tasted like this every day!" Me too, honey. Me too. I'll stick to my healthy snacks for now, but there are a few of these leftover.....

Happy Birthday, Lauren!
Andrea

Wednesday, December 18, 2013

Mostly Clean Rainbow Sprinkle Cookies

Sometimes I really stink at following a diet. My two biggest pitfalls are french fries and anything sweet. Tonight, I really wanted something sweet, and I had my eye on some ice cream... but I decided to bake something instead. So I came up with these (mostly) clean rainbow sprinkle cookies. The rainbow sprinkles are what makes them not-so-clean. My mom said they were okay, but my dad got excited when he saw one and ate one in a single bite. Of course I didn't tell him they were healthy, because then he would have turned his nose up at them. He liked them! I was surprised, he can usually sniff out anything healthy in order to stay far, far away from it. I like them a lot, and they are just enough for me to make it through the nightly sweet tooth attack.

Mostly Clean Rainbow Sprinkle Cookies
Ingredients:
  • 1 cup oat flour (I never buy oat flour, I just buy a large container of oats and run them through my Ninja blender)
  • 1 scoop vanilla protein powder
  • 1 Tbsp stevia
  • 2 tsp coconut oil
  • 2 egg whites
  • 2 Tbsp almond milk
  • 1/8 tsp baking powder
  • 1/8 tsp salt
  • 2 Tbsp rainbow sprinkles

Preheat your oven to 325 degrees. Combine all of the ingredients in a mixing bowl. At first, I wasn't going to add the egg whites, but they definitely needed some more wet ingredients, so I added one egg white at a time until they were at the correct "cookie dough consistency".


 Spoon out tablespoonfuls of the dough, and roll into balls. They don't rise very much, so press them down a bit on a nonstick pan. I ended up having to press them down while they were in the oven and it pressed the sprinkles into the cookies, so I advise just doing it before you pop them in the oven.


Bake for 10-14 minutes in the oven, then remove and allow them to cool.


This batch came out at 14 cookies, meaning that each individual cookie has about 51 calories, based on the ingredients I used. Not too bad! 

These are by no means the "perfect clean cookie", and I feel like it's probably impossible to make one because what makes cookies delicious are sugar, butter, sugar, and butter. But these are pretty dang good to me. And versatile, as well. I'm considering replacing the sprinkles with mini chocolate chips in the near future... so stay tuned for that! :)

Happy healthy baking!
Andrea

Monday, December 16, 2013

Chicken Taco Stuffed Peppers + Taco Seasoning

Not too long ago, I first attempted to make stuffed peppers. To be honest, they were bland. I didn't think I would try them again, but usually if something doesn't work out well the first time I cook it, I always tweak and retry, because I don't like thinking that I can't cook something well enough. So, tonight I decided to try the stuffed peppers again, this time using a lot more seasoning and flavor, and I had completely different results. I loved these, and I'm so glad I made extra so I can eat one again tomorrow! I paired them with crispy baked Parmesan asparagus and brown rice. And bread for my dad, because no meal in our house can be served without bread.

Chicken Taco Stuffed Peppers
Ingredients:
  • 5 large bell peppers of any color (I chose green because they were the cheapest)
  • 1 lb ground chicken (you can replace the chicken with turkey or beef if you like)
  • 2 Tbsp taco seasoning (recipe below)
  • 1 small onion/shallot, chopped 
  • 1/3 cup grated Parmesan cheese
  • 1 (4 oz) container of Athenos Tomato & Basil Feta Cheese
  • sliced/shredded mozzarella (I always use skim mozzarella slices)

Preheat your oven to 425 degrees. Coat a large saucepan or skillet with nonstick spray, and cook the ground chicken (or your meat of choice) with the taco seasoning and chopped onion. When the meat is cooked through and the onions are soft, remove from heat. Put the meat into a bowl an stir in the feta and Parmesan cheeses. Cut the tops off of the peppers, remove the seeds and other inside parts, and place upright on a baking sheet or other nonstick pan. I used an iron skillet sprayed with olive oil nonstick spray. Finally, fill with the meat and cheese mixture.


Bake the peppers for about 25 minutes. Then, remove the pan from the oven, top with mozzarella cheese, and set your oven to broil. I placed mine on the lowest rack, as far away from the fire as possible, and let them broil for 3 minutes, just enough for the tops to turn golden and the cheese to get perfect and gooey.


After letting them cool for a few minutes, I devoured one. They were delicious, full of flavor, and healthy. One thing they were not: boring. My biggest struggle when trying to be healthy is finding foods that are flavorful and don't make me feel like I'm sacrificing so much in order to improve my health. 


Now for the seasoning!

Homemade Taco Seasoning
In a small bowl, whisk together:
  • 4 Tbsp chili powder
  • 1 tsp garlic powder
  • 1 tsp red pepper flakes
  • 1 tsp dried oregano
  • 2 tsp paprika
  • 1 Tbsp ground cumin 
  • 1 tsp salt
  • 2 tsp black pepper
I store this in a small Ziploc bag because I use it pretty quickly after I've made it, but if you don't plan to use it soon or want to make larger amounts, I advise storing it in an airtight container. This seasoning really is what made the peppers so delicious, so I definitely recommend using it, or your favorite taco seasoning if you would rather not fuss with making your own.

Some other random life updates...

I finally found out where I will be placed for student teaching beginning in January, and I will be teaching kindergarten at a wonderful school in Hoover. I go to meet them tomorrow morning, and I can't wait! I hope that once the semester begins I will have time to share some more of my recipes, as well as some classroom activities I'm doing.

I've also been enjoying my free time this break including making these fun gingerbread houses with my fiance, Chad, and some cuties that I babysit.


Hopefully next week I'll have some more to share! I'm planning a hot chocolate bar for Christmas Eve, and some other surprise baking is in the near future! 

Andrea

Thursday, December 12, 2013

Cheesy Chicken Taquitos

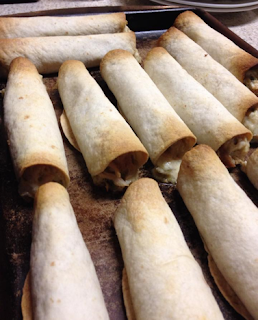
My family and my fiance both love my chicken enchilada recipe, but I was getting a bit bored with making the same dish every time I was craving Mexican style food. So I decided to try to make something a little different - chicken taquitos! And they were so good! I've been enjoying the leftovers, as well.

The one thing I hate to do, however, is cook chicken. But the deli at Wal-Mart makes a pretty delicious rotisserie chicken, so that is my secret shortcut for almost every single chicken recipe that I prepare.

Cheesy Chicken Taquitos
  • 1 rotisserie chicken, shredded and skin removed
  • 4 ounces cream cheese, softened
  • 4.5 ounce can green chiles
  • 2 cloves of garlic, minced
  • 1 tsp dried, minced onion
  • 1/2 tsp chili powder
  • 1/2 tsp cumin
  • 3 Tbsp chopped cilantro
  • 2 cups shredded pepper jack cheese
  • 12 small flour tortillas 
These are pretty simple to make. Preheat your oven to 425 degrees. Throw all of the ingredients (except for the tortillas, obviously) into a large bowl and mix it all up until all of the ingredients are incorporated. Then, spread a spoonful of the mixture close to the edge of a tortilla shell, roll up, and arrange on a non-stick or stone baking pan.


Bake in the oven for 20 minutes, and enjoy!


We ate these with some Mexican style rice on the side and queso drizzled over the top. Because, really, you can never have enough cheese. 


Happy Cooking!
Andrea
 

Tuesday, December 3, 2013

Spinach Artichoke Spaghetti Squash Bake

As I mentioned in my last post, I've decided to get back to my "mostly clean" eating regimen that I followed strictly over the summer now that I have a break between the two major holidays in which I consume ten times the normal amount of daily calories. I lost about 16 pounds over the summer by following a very strict "clean" diet, but it's hard to be 100% clean when I really don't always have time to do the meal preps. I also hate meal preps because I love to cook as often as I can. But by doing meal preps on Sundays, I'm unable to cook as frequently as I'd like to do so, and it's a major way for me to relieve some stress. I need to cook!

One of my absolute favorite foods to cook with when following a clean diet is spaghetti squash. I know what you're thinking...

 "Ew, squash!"

Let me tell you, I have never been vegetables' #1 fan. When I was a kid, it was strictly chicken fingers with a side of mac and cheese, please. And that was about it, unless it was Friday Night Pizza Night in the Brascho household. But as I got older and started cooking more, I came to find that I liked vegetables when they were cooked certain ways, especially if I was the one to do the cooking. Part of becoming a less-picky eater came about when I was actually able to cook things myself to see that there weren't completely disgusting things being done in the cooking process to things I had never tried because they "looked gross".

I love spaghetti squash because it is so versatile. No, it does not taste like spaghetti pasta, so don't get any false hopes going into this if you've never had it before. It's simply a healthy alternative for when you want to enjoy the sauces and recipes that typically call for carb-and-starch-heavy pastas.

You have some options for preparing your spaghetti squash. I always cut mine in half before cooking it so I can scrape out the seeds and "guts" in the middle, kind of like a pumpkin. It's pretty hard to cut it in half, so I usually have to get Daddy or Chad to do it for me. I managed to get this one cut in half by myself, though, because I was at home alone and hungry... but I had to use two butcher knives. It was terrifying. I don't recommend doing that.


Once you've removed the middle stuffs, you have a couple of options for how you want to cook the squash.
1. Microwave: In a glass or other microwave-safe baking dish, put about 1 inch of water into the bottom. Put the spaghetti squash into the pan so that the cut side is facing down. Cover with plastic wrap and microwave 10-15 minutes. The time depends on the size of the squash. I typically start with 12 minutes, check it, and then add more time if necessary. The outer skin should be pretty soft.
2. Oven: Place the squash on a baking pan or sheet with the cut side facing up. Bake at 400 degrees for about 25-30 minutes. When you cook it this way, the squash will be firmer than when cooking it in the microwave, so it might not look like it's ready to scrape, but it will be. The added moisture in the microwave changes the texture of the squash, making it a little more tender.


This time, I baked the squash in the oven because I wanted it to be a bit firmer.


Then, use a fork to scrape out the rest of the inside walls of the squash. It will come out in fine strands.


Keep the outer shells! You will need them to refill with the squash and sauce mixture for baking later! This isn't necessary, but I like the presentation of it as opposed to just a baking dish.

Spinach Artichoke Spaghetti Squash Bake
Ingredients:
  • 1 spaghetti squash, cut into halves, cooked, and scraped clean
  • 2 cloves of garlic, minced
  • 2 tsp minced, dried onion
  • 1 (15 oz.) can of quartered artichoke hearts, drained
  • about 8 cups of fresh spinach
  • 3/4 cups Greek yogurt
  • 3/4 cups Parmesan cheese, plus some for sprinkling
  • 3/4 cups shredded mozzarella cheese, plus some for sprinkling
  • 1/2 tsp red pepper flakes
Spray a large saute pan with olive oil spray. Set to medium heat, and add the garlic. Saute for about 2 minutes, then add the artichokes, minced onion, and red pepper flakes. Cook for an additional 5 minutes, stirring frequently.


Add the fresh spinach, and spritz with some additional olive oil spray. Cover the pan, and let the spinach cook down for a few minutes.


Once the spinach has cooked down, remove the pan from heat and add the Greek yogurt, Parmesan, and mozzarella cheeses. Stir these ingredients in completely.

 Now, add your prepared spaghetti squash "noodles" to the mix, and stir until it is all incorporated. Once this is done, scoop the mixture into the shells you saved from the spaghetti squash earlier. If you don't want to do this, you can spray a baking dish with olive oil spray and bake it the same way. Sprinkle the tops of each half with additional Parmesan and mozzarella. Place the squash into your 400 degree oven and bake for about 20 minutes, then bump the oven up to broil for about 2 or 3 minutes, or until the tops are golden and crisp.


This recipe makes 5-6 servings (or at least it did with the size of the squash I used), and it is very filling. My favorite thing about this recipe is that it is healthy, but you feel like you are indulging a little bit because of the spinach and artichoke dip flavor that you get from the sauce, as well.


Happy (healthy) baking!
Andrea

Sunday, December 1, 2013

Iron Bowl Eats and Sunday Breakfast - Three Recipes!

In Alabama, everyone has something to do on the Saturday after Thanksgiving. Even if you aren't a fan of either team, you still watch Alabama and Auburn play in the Iron Bowl. Yesterday afternoon we had some family and friends over to watch the greatest rivalry in all of football, and while Mom was making some oven-smoked barbecue, I was in charge of the other snacks.

Lately I've been trying to get back to my "clean eating" regimen that I followed very strictly over the summer (and lost a good deal of weight, I might add - definitely something to look into if you are wanting to live a healthier life and feel better). But, with the holidays it's difficult to be so strict because, let me tell you, my Nana cooks literally the best southern food you will ever consume in your lifetime, and she loves cooking for everyone. Her birthday was the day after Thanksgiving this year, but she still devoted her time to make sure that everyone else in our huge family had a wonderful day together. And then there's football and the snacks that come along with that, and none of them are very healthy. So, I'm playing that game of "I'll start my diet tomorrow" at the moment.

I did attempt to make one of my favorite recipes a bit healthier yesterday, though. And when I say "a bit", I mean that there's still a lot of bacon included, I just cut out some of the not-so-healthy stuff and replaced it with something way better for you. My aunt Joy shared a bacon cream cheese dip recipe with me a few years ago, and I've made it so much since then, and I swear it's the best dip you will ever have.

Bacon Cream Cheese Dip
Ingredients:
  • 8 ounces cream cheese, softened
  • 1/2 cup mayo (here I substituted a 5.3 ounce container of plain Greek yogurt; mayo has 100 calories per tablespoon, while the whole container of yogurt has 80 calories and much more protein)
  • 1 cup grated Swiss cheese
  • 1/2 cup grated mozzarella cheese
  • 8 slices of bacon, cooked and crumbled (or a bag of real bacon bits)
  • 1/2 cup crushed Ritz crackers

Preheat your oven to 350 degrees. In a large bowl, beat together all of the cheeses and the mayo/Greek yogurt. Pour into a baking dish that has been coated with non-stick spray. Pour the crushed Ritz crackers and crumbled bacon on top, then bake for 15-20 minutes, or until bubbly. Serve with Ritz crackers or pita crackers, which is what we had yesterday. So easy and so delicious!!


I also have a pretty serious love for sweets, as any of you who have browsed my blog before already know. For some reason, lately I have been dying to make pecan pralines. I have had a recipe for them for so long, and I honestly cannot remember who/where I got it from, but they are the best pralines I've ever had. My fiance, Chad, and I went to New Orleans back in January, and while we were there I bought some pralines at a candy store. These pralines are better. My mom's best friend has a niece who is married to a chef from New Orleans who makes pralines constantly, and she gets some from him every year for Christmas. She told me yesterday that these pralines are better. I thought that was a huge compliment! I had really forgotten how great these were, and I can tell you I will be making more soon.

Pecan Pralines
Ingredients:

  • 1 3/4 cup pecan halves
  • 1/2 cup heavy cream
  • 1/2 cup unsalted butter
  • 2 1/4 cups light brown sugar
  • 2 tsp. vanilla extract
  • 2 tsp. bourbon (optional - I omit this usually)
  • **You will need a candy thermometer!

Line your counters or a cookie sheet with parchment/wax paper. Clip your candy thermometer to the side of your saucepan, being sure not to let the tip of the thermometer touch the bottom of the saucepan. Put the cream, butter, and brown sugar in the pan on medium/high heat. Monitor the temperature of the candy the whole time. You want the temperature to reach 240 degrees, but not go any higher than that. This is called the "soft ball" stage, meaning that if you place a drop of the candy mixture into a bowl of cold water, it will form a soft, round ball. This is the stage that creates fudge, also. Also while you are cooking, check to see if you need to stir the mixture once or twice. The pans that I use tend to scorch things a bit, so I usually have to stir more frequently than I would have to if I were using my mom's set of cookware. Once the temperature of the candy reaches 240 degrees, remove the pan from the heat and let it sit for about 15 seconds, then add the pecans, vanilla, and (if you're using it) bourbon, and stir until slightly thickened. Drop the mixture onto the parchment paper and allow to cool for 20-30 minutes.


I think I ate about three of these yesterday. I literally have no self-control when it comes to pralines. A lot of people might be getting these as part of their Christmas gifts this year! :)


Khaleesi did not appreciate all of the loud football fans and nap-time interruptions yesterday, so she stayed close to me and Chad. Or, as we like to call ourselves, "her people".


I know this is a super long post, but I have one more recipe to share with you all. I didn't exactly follow a recipe for this as much as see a picture of it on Pinterest and say, "I can do that!"

Bacon, Egg, and Cheese Crescent Rolls
Ingredients:

  • 1 package of refrigerated crescent rolls (I used the Honey Butter kind because that's what we had in the fridge)
  • 4 eggs, cooked scrambled style
  • about 4 slices of cooked bacon, crumbled, or 1/2 bag of real bacon bits
  • sharp cheddar cheese, cut into slices

Preheat your oven to 350 degrees. Roll out the crescent rolls, and place some of the sliced bits of cheese on the wide end. Top with a spoonful or two of scrambled eggs, then some crumbled bacon. Roll up each crescent and bake for about 15 minutes.


That's it! So easy, but really a new breakfast favorite for me. I've been wanting to make breakfast casserole for a while, but that takes a lot more ingredients and a lot more time, and these are like mini-versions of the casserole that I usually make. Maybe some time soon I will make that again and share it here.

Happy December!
Andrea